maandag, juli 31, 2017

2017 in Blogposts - July

July filled with blogposts.
Juli, weer een maand gevuld met blogberichten.

Darkroom Door Mesch Stencil & Seaside Inchies

Here's another card I made, using a new Darkroom Door stencil.
Nog een kaart gemaakt met een nieuwe stencil van Darkroom Door.

I started by adding texture, using Liquitex Light Modeling Paste and the small Mesh stencil.  Let it dry and covered the piece with a coat of Distress Paint.  After the paint had dried I sanded the raised parts using Tim's sanding grip.
Eerst bracht ik op 2 hoeken textuur aan met de kleine Mesh stencil en Liquitex Light Modeling Paste.  Laten drogen en er een laagje Distress Paint op aangebracht.  Voor een verweerde look schuurde ik met de sanding grip van Tim Holtz hier en daar, na het drogen, wat verf weg.

I added a bit of stamping using Distress Oxide Ink with the Mesh Texture Stamp and the circles from the Grunge Marks Stamp Set by Darkroom Door.
Op de vlakke delen drukte ik met Distress Oxide Inkt de Mesh Texture af, en de cirkels uit de Grunge Marks set van Darkroom Door.

It was going to be a card with a sea/beach theme.  So I chose the Seaside Inchies stamps.  Inked them up with Distress Oxide Broken China and Vintage Photo.  I used my finger as an ink blending tool to soften the hard ink lines.
Het ging een kaart met een zee/strand thema worden.  Dus koos ik de Seaside Inchies stempels.  Beïnkt met Distress Oxide inkten Broken China en Vintage Photo.  Om harde inktranden te vermijden gebruikte ik mijn vinger als een ink blending tool :)

To "clean" the stamp I spritzed with water and made several more prints.  (I used the ultra light print already as a background on THIS card)
Om de stempel weer proper te maken vernevelde ik er water over en maakte nog een paar afdrukken die steeds lichter werden.  (Ik gebruikte de heel lichte afdruk al als achtergrond op DEZE kaart)


I punched out the inchies I wanted to use on this card, inked the edges.  Words and anchor are from the Sail Away set.
De inchies uitgeponst en de randen gesponst.  Tekst en anker gestempeld.  Ze komen uit de Sail Away set van Darkroom Door.


I used:
Darkroom Door Small Stencil:  Mesh
Liquitex Light Modeling Paste
Darkroom Door Stamp Sets:  Seaside Inchies, Sail Away, Grunge Marks
Darkroom Door Texture Stamp:  Mesh
Distress Paint:  Peacock Feathers
Distress Oxide Inkpads:  Broken China, Vintage Photo
Tim Holtz Sanding Grip
1" Punch EK Success

*****
Darkroom Door Blog Hop & Giveaway

For a chance to win some of the new Darkroom Door stencils, and to see lots of inspiring projects, go to Darkroom Door's Stencil Blog Hop post here: CLICK
Wil je kans maken om enkele mooie Darkroom Door stencils van jouw keuze te winnen, en veel inspirerende projecten zien, ga dan snel naar het Darkroom Door Stencil Blog Hop bericht:  HIER

zondag, juli 30, 2017

Darkroom Door - Stencil Blog Hop

Darkroom Door is celebrating the release of Darkroom Door Stencils with a Blog Hop.
Be sure to read until the end of this long blogpost, because there is a giveaway too.

Darkroom Door brengt nu ook Stencils uit.  En dat wordt gevierd met een Blog Hop.  Zijn ze niet prachtig?
Als je helemaal tot beneden aan dit lange blogbericht leest, zie je hoe je enkele van deze prachtige stencils kan winnen.

Lots of possibilities with stencils.  Today I'm sharing this set of cards.  I used several Darkroom Door stencils to create the layered background.  I love that the stencils come in two sizes.
Veel mogelijkheden met stencils.  Vandaag toon ik deze set kaarten.  Om de laagjesachtergrond te maken gebruikte ik een aantal van die mooie stencils.  Tof dat de stencils in twee maten verkrijgbaar zijn.

First I applied these acrylic paints, using a plastic card.
Eerst deze acrylverfjes aangebracht met een bankpasje.

Next I used the large Crackle stencil with white Dylusions paint.
Daarna gebruikte ik de grote Crackle stencil met witte Dylusions verf.

Then I added Lime circles, using the large Circles stencil and Dina Wakley paint.
Daarna maakte ik felgroene rondjes met de grote Circles stencil en Dina Wakley verf.

Next step:  Tangerine paint, using the small Mesh stencil.
Volgende stap:  Tangerine verf gesponst door de kleine Mesh stencil

Last layer:  red paint and the small Mesh stencil.
Laatste laag:  rode verf en de kleine Mesh stencil.

Layers!
Laagjes!

I've cut 3 panels to add to a white card.  Flowers and words were stamped with black Archival ink.
Ik sneed 3 stukken van het grote vel laagjespapier af.  Bloemen en teksten werden gestempeld met zwarte Archival inkt.

Oxide Ink was used to ink the edges.
De randjes met blauwe Oxide inkt gesponst.


I used:
Darkroom Door Large Stencils:  Crackle, Circles
Darkroom Door Small Stencil:  Mesh
Distress Paint:  Weathered Wood
Dina Wakley Paints: Turquoise, Lime, Tangerine, Ruby
Dylusions Paint: White Linen
Darkroom Door Stamp Sets:  Carved Flowers, Simple Sayings Vol 2
Darkroom Door Eclectic Stamp:  Daisy
Archival Inkpad:  Jet Black
Mini Ink Blending Tool

*****

Here's a sneak peek of more stencil cards I made.  I'll show these soon.
Een glimp van nog meer stencilkaarten die ik maakte.  Jullie krijgen ze binnenkort te zien.


***** 

Now it's time for a giveaway! 
En nu de giveaway!


Be sure to visit each blog and leave a comment. 
Five lucky winners will will receive 3 stencils of their choice! 
Winners will be drawn from comments left across all the blogs, so be sure to leave a comment on each blog for more chances to win! 
Comments received before midnight Friday 4th August are eligible to be in the draw. 
Winners will be announced Monday 7th August on the Darkroom Door blog and Facebook page.
Ga zeker langs bij onderstaande blogs, en laat er een reactie achter.
Vijf winnaars ontvangen 3 stencils die ze zelf mogen uitkiezen!
Winnaars worden geloot uit de reacties op alle deelnemende blogs.  
Dus om je kansen te vergroten laat je best op elke blog een reactie achter vóór vrijdag 4 augustus middernacht (Australische tijd).  Dan wordt de loting afgesloten.  
Op maandag 7 augustus worden de winnaars bekendgemaakt op de blog en Facebookpagina van Darkroom Door.


Hop along to the other blogs here:
Deze blogs nemen deel:

Good Luck!

Sunday Scraps - 390

 As usual on Sundays, I made a card using leftover scraps.
Zoals gewoonlijk op zondag, maakte ik weer een kaart met restjes.

 I used wide double sided tape to arrange the strips, cut offs from recent cards.  Used a die to cut a circle.
De strookjes, afsnijdsels van recente kaarten, op breed dubbelzijdig tape geplakt.  Een cirkel uitgestanst.

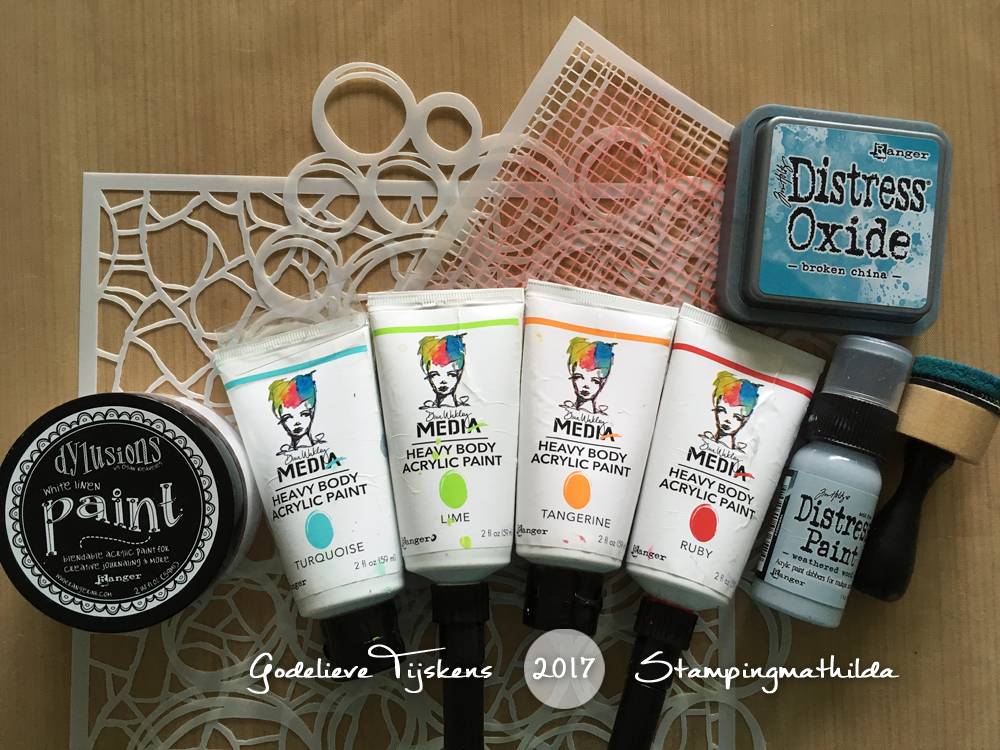
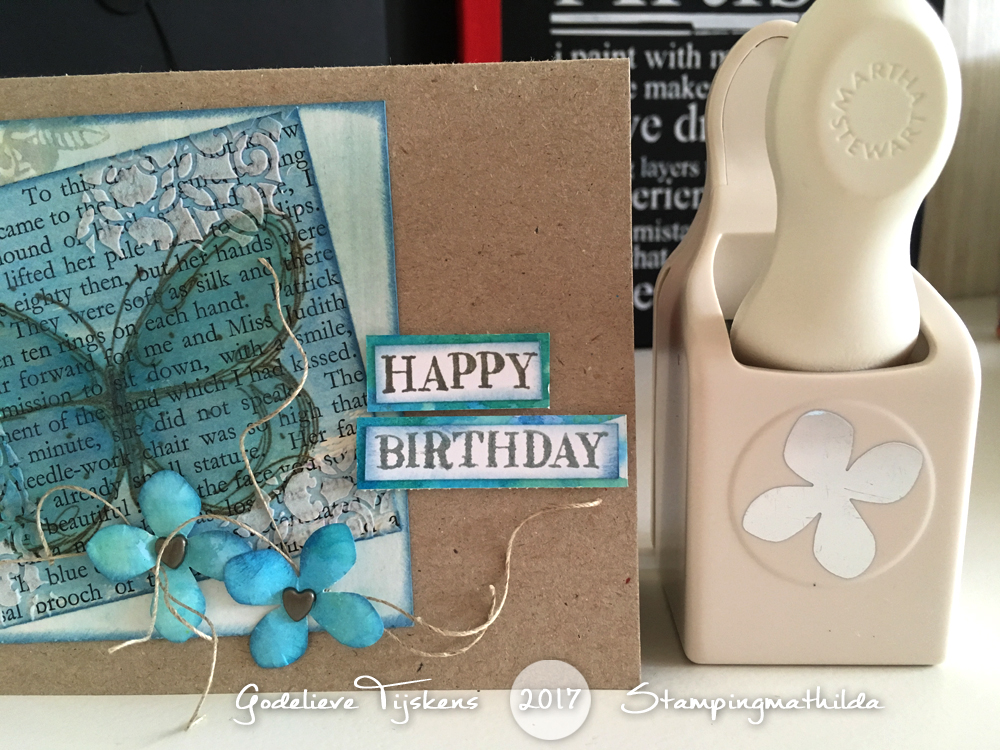
 I painted the backside of a vellum flower, and cut it out.  I used a glue dot to attach the flower to the circle.
Een vellum bloem aan de achterzijde met Distress Paint gekleurd.  Daarna uitgeknipt en met een glue dot op de cirkel gekleefd.

 I added white dots, using a Posca paint pen.  
Met een Posca paint pen witte stipjes gezet.  De wens gestempeld met zwarte Archival inkt.

Scraps!

I used:
Darkroom Door Stamp Set:  Fine Flowers
Fijne Verjaardag:  Crafts & Things Elke Verschooten
Die:  Lawn Fawn: Small Cross-Stitched Circle Stackables
Archival Inkpad:  Jet Black
Distress Paint:  Peacock Feathers
Glue Dots
Wide Double Sided Tape (Elke Verschooten)
Posca Paint Pen

Have a great Sunday!
Fijne zondag!

zaterdag, juli 29, 2017

Black & White - 326

Keeping it simple today :)
Eenvoudiger kan bijna niet :)

Stamps:  CatsOnAppleTrees, Artemio
Inkpad:  Colorbox Fluid Chalk Charcoal

vrijdag, juli 28, 2017

Congrats!

 Another quick card today.
Vandaag weer een kaartje dat snel af was.

 I found this stamped piece in my stash.  Looks like the background was stamped using a stencil with Distress Ink.  
Dit  stempelwerk vond ik in mijn voorraad.  De achtergrond werd gestempeld met een stencil en Distress inkt denk ik. 

I sponged the soil using Distress Ink Brushed Corduroy and added some "grass and weeds" using a brush.
De bodem gesponst met Distress Inkt Brushed Corduroy ook een poging gedaan om er wat grassen en onkruid mee te schilderen.

I used:
Darkroom Door Stamp Sets:  Gum Trees, Love Birds
Archival Inkpad:  Potting Soil
Distress Inkpads
Stencil: TCW456s Mini Sketch Grid

donderdag, juli 27, 2017

Distress Oxide Inkpads

Doing a bit of organizing today. You can download the Distress Oxide labels HERE
Vandaag krijgen mijn Distress Oxide inkten een label.  Je kan die HIER downloaden.

woensdag, juli 26, 2017

Birthday Tag Book

 Happy Birthday Rik!

 I misted the stamps with water and "inked" them with Scribble Sticks.  I over stamped lightly with black Archival ink.  
De stempels lichtjes nat gespoten en "beïnkt" met Scribble Sticks.  Daarna wat zwarte accentjes er overheen gestempeld met Archival inkt.

 I sponged with Distress Oxide inks, and used stencils too.
Met Oxide inkten gesponst, en ook stencils daarbij gebruikt.


I used:
Darkroom Door Stamp Sets:  Happy Birthday, Grunge Marks, Gum Trees, Enjoy The Ride
Dina Wakley Scribble Sticks:  Turquoise, Blackberry
Distress Oxide Inkpads:  Wilted Violet, Cracked Pistachio
Archival Inkpad:  Jet Black
Stencils: Tim Holtz Schoolhouse Stencil, TCW Mini Tiny Circles

dinsdag, juli 25, 2017

Beach Card

 A beach theme on this card.  I stamped the word block on top of a subtle seaside inchies background.

Een kaart met een strand thema.  De woordblokstempel werd afgedrukt op een lichte achtergrond van seaside inchies.

I used:
Darkroom Door Stamp Set:  Seaside Inchies
Darkroom Door Word Block Stamp:  Seaside
Distress Oxide Inkpads:  Broken China, Vintage Photo

zondag, juli 23, 2017

Sunday Scraps - 389

 I always enjoy picking scraps and leftovers (almost) every Sunday, to create something.
Zoals (meestal) op zondag zocht ik weer wat restjes bij elkaar om iets mee te maken.

 A left over butterfly from a previous card got some extra blue color.
Een vlinder die ik van een vorige project over had kreeg nog wat extra blauw.

 I used pencils to color the modeling paste.
Met potloden de modeling paste bijgekleurd.

 I often use this Martha Stewart punch, it is a favorite.
Weer eens die favoriete bloemenpons gebruikt.

Scraps!

I used:
Darkroom Door Stamp Sets:  Fine Butterflies,  Happy Birthday
Carabelle Stamp
Distress Inkpads
Modeling Paste
Tim Holtz Mini Layering Stencil
Martha Stewart Hydrangea Punch

Have a great Sunday!
Fijne zondag!

zaterdag, juli 22, 2017

Black & White - 325

 I bought this quare black Dylusions Creative Journal a while ago, and finally had the courage to start using it.  
Een poos geleden kocht ik dit vierkant zwart Dylusions Creative Journal, maar stelde steeds maar uit het te gaan gebruiken.  Bang om het te verprutsen.

I decided to start with the cover inside.
Begonnen met de kaft binnenin.

 I used a Donna Downey stencil, Dylusions paint and a mini blending tool.  I used paper clips to keep the stencil in place.  
Een Donna Downey stencil gebruikt, Dylusions paint en een mini blending tool.  Om zeker te zijn dat de stencil niet zou verschuiven maakte ik hem vast met paperclips.

Love how it turned out.  
Blij met het resultaat.

I used:
Dylusions black Creative Journal
Dylusions Paint:  White Linen
Donna Downey Stencil: DD-068 Artist
Mini Ink Blending Tool